Tuesday, November 12, 2013

Coho Waiting for the Rain...


The beautiful autumn we've been having is definitely causing trouble for the salmon in the smaller tributaries...
...in reviewing the tributary to the larger creek, no salmon are able to move upstream beyond the first riffles, effectively restricting the coho in shallow pools.


This physically restricts the normal breeding patterns of coho: mates restricted, spawning site selection limited, spawning and redd progression restricted.


This is a very large pair, the larger coho is ~3' long.

.

Monday, November 11, 2013

Coho Salmon - Competing for Space and Mates


Coho salmon competing for spawning habitat and mates... in a tributary of Woods Creek, Snohomish County, Washington.
.
.

.

Sunday, November 10, 2013

Today in... the Creek ~> Jockeying for Position.

Coho salmon jockey for position in a tributary to Woods Creek, Washington.


.For best viewing change settings to 1080 HD.


Saturday, November 9, 2013

Today in ~> the Creek ... confluence... Woods Creek

Yesterday we took the time to film at the confluence of the forks of Woods Creek... while we were there we saw several salmon jump just below the confluence and caught one on video (see video below at ~ 16 seconds in).


.
~> best viewed in 1080 HD (re-set your YouTube settings ; ) 
The west fork enters on the lower left; downstream flows to the right.
The Woods Creek confluence is north of Monroe on Yeager Road.

.

Friday, November 8, 2013

Today in~> the Creek... just add water.

With yesterday's rains the water levels have risen dramatically and the salmon are on the move...


.
The video was captured in 1080 HD, please change the settings (lower right corner of the video) to experience the video at it's optimum.


Wednesday, November 6, 2013

Today in ~> the Creek ... Coho Waiting for Rain

The water levels have definitely dropped since Sunday.
The water in the main creek is no longer high enough to allow for fish passage over barriers and the water levels in the smaller creek have dropped enough that the fish are effectively trapped in short reaches, are restricted to moving downstream, or are at/ near the confluence of the tributary and main stem of the creek.


^Video of Coho moving downstream today, waiting for more rain.

.

Monday, November 4, 2013

Today in ~> the Creek ... Coho Salmon Spawning

Today in the Creek...


Every year when the late October / early November rains swell our Creek (a tributary of Woods Creek, Washington) Coho salmon are able to pass the many fish barriers and ascend the creek.

This year we knew the salmon were just a bit downstream of us for almost 2 weeks before the rains this past weekend allowed them upstream access. Now that they are here the eagles will not be far behind...


Sunday, July 7, 2013

Asian Small-Clawed Otters at Woodland Park Zoo, Seattle


On June 11, 2013, four pups were born to the new pair of Asian small-clawed otters at Woodland Park Zoo, Seattle. The 8 year old male and 4 year old female are first time parents.


^ This is borrowed video! This video is embedded from YouTube, Produced by Ryan Hawk, posted June 20, 2013.

Asian small-clawed otters have been listed on the "vulnerable" list since 2008, with population estimates generally thought to be at 5,000 or fewer. The greatest threat to this species is poaching and water quality degradation (pollution).

The pups will have to pass their "swim test" before they are released with their parents into their new enclosure at Woodland Park Zoo.

More information about Asian small-clawed otters is available at OtterQuest!

.

Monday, May 13, 2013

Space Oddity, as performed by Chris Hadfield ON the International Space Station

Seen this yet? No? Watch it. Now. 
You have? Enjoy again! It makes me smile every time.


Astronaut, Commander Chris Hadfield, filmed this rendition of "Space Oddity" (with the permission of David Bowie) while he was in space, on the International Space Station, on May 12, 2013.

He has
-2 shuttle missions
 Mission Specialist 1 on STS-74, Mission Specialist 1 on STS-100,
- In May 2010, Hadfield served as the commander of the NEEMO 14 mission aboard the Aquarius underwater laboratory, living and working underwater for fourteen days.[8][9] NASA announced in 2010 that Hadfield would become the first Canadian commander of the International Space Station, leading Expedition 35 after its launch on 19 December 2012.[10] His craft docked with the station on 21 December. He remained on the station for five months, transferring control to Pavel Vinogradov and departing on 13 May 2013.[11] Hadfield is enthusiastic about the prospects for a manned mission to Mars, and when asked if he would consider a one-way journey to Mars to be the first to visit, he said "I would be honoured to be given the opportunity.


We at Quest feel that this is one of the most amazing things we've seen all week ; )

.

Saturday, March 30, 2013

Article: Giant Paleo-Otter from the Pliocene, from Dikika, Ethiopia

Article: Enhydriodon dikikae, sp. nov. (Carnivora: Mammalia), a Gigantic Otter from the
Pliocene of Dikika, Lower Awash, Ethiopia (link to complete article).

A partial skull, low jaw section, humerus, and some femur fragments found in the Afar Valley, Ethiopia, have been used to describe a previously undescribed species of ancient otter.
Geraads and colleagues state, "The most striking feature is its very large size", referring to the skull, which if proportioned like a modern otter would result in a skull 10 inches long. Estimating total size using the fossils found indicates an animal over 7 feet long, but these estimates would be very rough considering possible variations.


Thursday, March 21, 2013

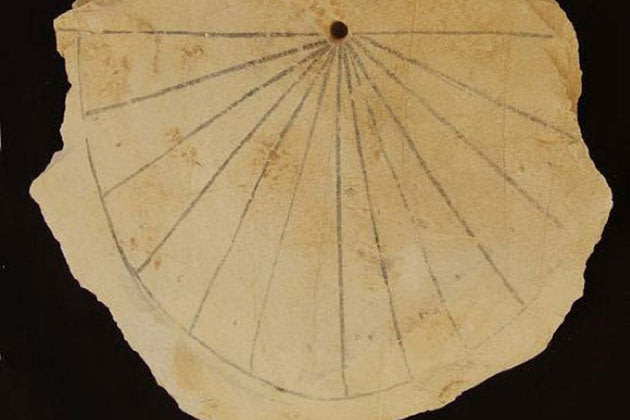
News: Ancient Egyptian Sundial Discovered at Valley of the Kings


A sundial dating to the 13th century B.C. and considered one of the oldest Egyptian sundials, was discovered in Egypt's Valley of the Kings, the burial place of rulers from Egypt's New Kingdom period (around 1550 B.C. to 1070 B.C.).
The 13th century BC (19th Dynasty) Valley of the Kings sundial may be the oldest Egyptian sundial. It was discovered just outside the Valley in (what is believed to be) a workman's home.
"The significance of this piece is that it is roughly one thousand years older than what was generally accepted as time when this type of time measuring device was used," said University of Basel researcher Susanne Bickel. Bickel has worked in the area since 2008.

From LiveScience:
The sundial is made of a flattened piece of limestone, called an ostracon, with a black semicircle divided into 12 sections drawn on top. Small dots in the middle of each of the 12 sections, which are about 15 degrees apart, likely served to give more precise times.
A dent in the center of the ostracon likely marks where a metal or wooden bolt was inserted to cast a shadow and reveal the time of day. [See Images of the Sundial and Egyptian Burials]
"The piece was found with other ostraca (limestone chips) on which small inscriptions, workmen's sketches, and the illustration of a deity were written or painted in black ink," Bickel told LiveScience in an email.
Bickel and her colleagues aren't sure for what purpose the workmen would've used the sundial, though they suggest it may have represented the sun god's journey through the underworld.
"One hypothesis would be to see this measuring device in parallel to the illustrated texts that were inscribed on the walls of the pharaohs' tombs and where the representation of the night and the journey of the sun god through the netherworld is divided into the individual hours of the night," Bickel wrote. "The sundial might have been used to visualize the length of the hours."
The device may have also been used to measure work hours. "I wondered whether it could have served to regulate the workmen's working time, to set the break at a certain time, for example," she said. However, Bickel noted, a half-hour wouldn't mean much to these people.
In the same area, Bickel and her colleagues have made several amazing discoveries, including a tomb with two burials, one from Egypt's 18th dynasty and the other from the 22nd dynasty, which was brought into the tomb some time after the pillaging of the first burial. A wooden coffin linked to the secondary burial contained the mummy of a chantress of Amun called Nehmes-Bastet. The scientists are not sure who would've been buried in the original tomb, though they found remains of a mummy without linen bandages on the floor of the structure. "This badly broken mummy is probably the original first owner of the tomb," write the researchers on their website.

Wednesday, March 6, 2013

The Evolution of The Crocheted Kraken! (instructions included)


... evidence for the evolution of the crocheted kraken...


As I said in the blog post [Beginner's Crochet and Basic Projects (Crochet #1)]- about a month ago I was shown a really cool scale design that had been crocheted... and suddenly, and unexpectedly, realized I wanted to know how to crochet so I could make a similar design, in wire. This was when I realized that I suddenly, and urgently, needed to learn to crochet! (as i said in the first crochet post, i really didn't see this coming, at all).


So, to gain the experience I would need for making scales, I made 
<~ a face cloth, 
and then a hat ~> , 
and then
 started on the next 
...
(more complex)
...
                        ... hat ~>

... I know, where is the kraken?! 
I just wanted to demonstrate, first, how quickly, 
in crochet, you can move 
from making a simple useful thing (face cloth) 
to making something very 
useful and functional (hats) 
to making *really* important things (krakens and scales!).


As you test this pattern (because, yeah... while i tested this on myself, this is the first crochet pattern I've ever written, there may be an error or 2, but contact me and i'll help you through and correct the pattern!)

Crocheting a Kraken (or squid ; )

First, choose your color and texture!
You can choose yarn or any sort of string, but if you are fairly new to crochet I suggest something that isn't too fuzzy, complex, or very fine for this project.

I crocheted 2 squid / krakens, partly because the first one was made from a bulky yarn which looked better with a larger design than I'd originally intended (for my hat ; ) ... and partly to test the pattern I created for the kraken.

Keep in mind that the size of the "string" (yarn) will directly affect the size of your kraken, hopefully the sizes I used will give you an approximate guideline if you alter sizes.


The Giant Squid / Kraken Crochet Pattern

[The first photos are of the squid before stuffing!]

Things You'll Need (Materials)
~yarn/ string/ ?thread      ~crochet hooks
~eyes (beads/ buttons)    ~scissors
~needle                             ~choice of stuffing
                                         
First choose your yarn / string.
  < {A- for my first kraken I used "Bulky" yarn (Loops and Threads~ Charisma) and a "K" crochet hook ("L" was suggested on the packaging).
   {B- for my second kraken I used "Fine" yarn (Merino wool) and "F" and "G" crochet hooks. >

One important thing to recognize: if you are following these instructions and you aren't using U.S, crochet definitions you may/will have to translate the stitches!
US to UK conversions are here.  If you *are* converting, I recommend printing out the instructions and overwriting your conversion!


Beginning the kraken
1} chain (ch) 3 stitches.
   {B use "G" hook for {B squid.
Loop the the 3rd chain to the 1st and get ready to begin the next row of stitches...
   {B for {B squid switch to to "F" hook.
2} crochet 2 double crochet (dc) in each for one round ( = 6 dc).
3} single crochet (sc) for one round ( = 6 sc).
4} sc in each stitch and in every 3rd stitch crochet TWO single crochet stitches (2 sc) (result = ~8 sc in this round)~ this is called an "increase" (incr = increasing the number of stitches per row over the previous row by putting more than one stitch in some (or all) stitches from the previous row)
5} sc in each stitch for one round (~8 sc)
6} sc in each stitch and increase (incr) in every 3rd stitch (result = ~10 sc in this round).
7} sc in each stitch and incr in every 4th stitch (result = ~12 sc in this round).
8} 1sc in each stitch ~4 additional rounds (for {B the length of the body is ~ 1 1/2+" at this point)

9} incr in every 4th stitch (one round).
10} incr in every 6th stitch (for {B the length of the body is ~ 2+" at this point)
11} sc in each stitch for ~7 rounds rounds (there is about 21 sc stitches in each round and for {B the length of the body is ~ 3" at this point)
12} sc in each stitch skipping over every 5th stitch~ this is called a "decrease" (decr = decreasing the number of stitches per row compared to the previous row by putting fewer crochet stitches in some stitches from the previous row) for one row.
13} decr sc every 3rd stitch for one row (result = 8 sc in this round)
14} 1 round of sc in each stitch (8 sc "links") ~ these 8 sc will be called the "base 8" (for starting each of the 8 arms)

   ~> IMPORTANT! DO NOT CUT YARN!
The squid can be stuffed at this point, or stuffed when completed (I stuffed mine after the crochet was completed).

ARMS
15} Each arm will be started in one of the "base 8" stitches, as a continuous piece. The yarn will not be cut until all 8 arms and the 2 tentacles are completed. The arms are each 30-39 foundation chains long (ch). At the end of the chain, return back up the chain starting with single crochet (sc), and continue "up the chain" using either the individual directions for each arm (below) or use YOUR OWN IDEAS. At the top of the chain, stitch through either the stitch used to start that arm or a stitch low on the body, then "turn" and stitch through the next of the "base 8" stitches to start the next arm. 
See diagram.
The "abbreviations" that look like e.g. 3(scx2) means THREE sets of what you see in the parenthesis {in other words 2 single crochet stitches in each of the next THREE stitches (sets)} AND 2(scx2, sc) means TWO sets of the stitches inside the parenthesis {which would be scx2, sc, scx2, sc}
   15} 1) ch 30 - 12 single crochet stitches (12 sc), 2 sets of single crochets twice in each stitch (2 scx2), 12 sc, in the next stitch crochet 2 single crochet stitches (scx2), finish up the arm with sc stitches (sc>) ;
   15} 2) ch 36 - 6sc, 3scx2, 9sc, scx2, scx3, scx2, 12sc, scx2, sc, 2(scx2), sc>
   15} 3) ch 31 - 3sc, scx2, 6(sc, scx2), 9sc, scx3, sc>
   15} 4) ch 39 - 12sc, scx3, 6sc, scx3, 3(3sc, scx3)
   15} 5) ch 30 - 3sc, 2(scx3, 3sc), scx6, 12sc, scx3, sc>
   15} 6) ch 36 - 13sc, scx2, 13sc, scx2, 3sc, scx3, sc>, last scx6
   15} 7) ch 33 - 3sc, 3(scx2), 3sc, scx2, 6sc, 2(scx2, sc), scx3, 6sc, scx3, sc>
   15} 8) ch 39 - 2(3sc, scx3, 3sc, scx6), 12sc, scx6, 3sc, scx3, 3sc, scx6, sc>

TENTACLES
16} To start the tentacles ch or sc in a stitch between the last arm and the "mouth" opening in the middle of the arms. a} The tentacles are each also based on a long chain, 54- 57 chains long. b} To create the tentacle sucker pad at the end of each chain (see diagram to the right ~> ) return back up the chain starting with 2 single crochets (2sc), and continue "up the chain" using 2 double crochets (2dc), one half double crochet (hdc), then 2 single crochets (2sc). THEN chain stitch through the chain and interlock chain stitch "around" the pad (ch through only ONE yarn "thread"), down to the tip of the pad then back "up" the other side to join the original descending chain. c} Interlocking chain stitch up the tentacle to the "mouth", d} sc to the opposite side of the "mouth" opening and start a new tentacle chain (between the "mouth" opening and arms opposite the first tentacle).
See diagram for general pattern.
   16} 1) ch 54 - then follow instructions outlined above a} through d}.
   16} 2) ch 57- then follow instructions outlined above a} through c}. Finish off.

FINS
17} "Flatten" the squid to determine /create sides /edges where each of the 2 fins will be stitched in place. Cut a piece of the yarn ~30" to 36" long and thread it (approximately) through the 1st and 2nd crocheted rows (the narrow end, where you started your crochet kraken!), with approximately half of it sticking out on each side. Each side of the fin will start with a chain stitch to anchor the stitching of each fin. Stitch from the narrow end in a ~ straight line toward the arms ("mouth" opening).
17} side 1) chain on 1, 3sc, 2hdc, dc, dcx2 with hdc (in the same stitch), chain and slip stitch to finish off.
17} side 2) chain on 1, 3sc, 2hdc, dc, dcx2 with hdc (in the same stitch), chain and slip stitch to finish off.


I'm realizing I should find those diagrams I made and add them  : ) 
~> ~> ~>


Join us in our ongoing Quest...
... continued ...

Wednesday, February 27, 2013

Crochet Terms, Definitions, and Conversions

An ugly truth about crochet is that the terms ARE NOT UNIVERSAL.
3/4 of the secret to understanding anything is having the terms to be able to think about what you are trying to think about!

So, before I go any further, my need for clarity is compelling me to write this post to share some of the basic definitions of terms and symbols for understanding crochet, and how this translates (is converted) to at least one other language. OK, technically it *is* the same language, only it isn't  ; )  .

Over time I will add links to short videos to demonstrate the stitch/ action.
If you have any corrections or another language you'd like to add, please send them to me, I'm happy to add!

Basic Terms and Symbols


Symbol
US crochet stitch terms
UK crochet stitch terms

 
slip stitch (slip st)

chain (ch)
chain (ch)


single (sc)
double (dc)

half double (hdc)
half treble (htr)

double (dc)
treble (tr)

treble/triple (tr)
double treble (dtr)

double treble/triple (dtr)
triple treble


gauge
tension


skip
miss


stitch (st)
stitch (st)


I'm starting with really basic terms, but I'll add more terms, definitions and (hopefully) cultural/language variations/differences!


Monday, February 18, 2013

Beginner's Crochet and Basic Projects (Crochet #1)

And now for something completely different...

Two weeks ago I was shown a really cool scale design that had been crocheted... I suddenly, and unexpectedly, realized I wanted to know how to crochet so I could make this really cool design, but in light-weight wire. So, I realized that I suddenly, and urgently, needed to learn to crochet! (yes, i was in shock too, i absolutely didn't see this coming).

Happily the friend who is to blame ;)  for this sudden urgent "realization" (she is the one who showed me the really cool scale pattern that she had crocheted using yarn) had an extra "K" hook with her, which she gave me, and a bit of extra yarn along with a very quick reminder lesson in "holding your yarn and crochet hook", "making a starter chain", and "single crochet for those sitting there with their mouths open". To be blunt her hands moved so quickly and efficiently that I was having a hard time seeing exactly what she was doing, but I'd watched my grandma when I was little (she'd taught  me some finger crochet) and I got the general idea! I needed to learn some basics about crochet before I could crochet wire scales! (imagine that!  ; )
On the way home I stopped and picked up some yarn...  ;  )

The next day I checked out a "how to" site online, which I can HAPPILY recommend as a very good tutorial site for crochet (very good for basic "what's that?" and  "how to" stuff and for advanced information too!) and very convenient to watch (over-and-over) closely to pick up the stitches, Crochet Geek! [ Crochet Geek seems to be an excellent source for crochet information and the Crochet Geek videos on YouTube are wonderful!  I'll likely do a few "how to" crochet blog posts, but I'm very new to this (and likely to make some unusual pieces) and Crochet Geek is *2 thumbs up*. ]


Anyway... so that day I crocheted a 24 stitch x 13 row "face cloth" blue "square" (anyone who crochets knows that, at best, the first time you crochet this standard practice piece  the best you really do is approximately rectangular  ; ) . I used this as an opportunity to learn the basics: chain, single crochet, half double crochet, double crochet, and triple crochet (in the interest of total disclosure, as i said earlier, i must confess that i learned some "finger crochet" eons ago from my grandma ; ) .


Some important things to keep in mind when choosing your yarn / string: washable?, dryer safe?, yardage (how long is it?), yarn weight (is it considered lace =0, super fine =1, up to super bulky =6?), size of crochet hook or knitting needle suggested, etc.; happily, this information is usually found on the back of the packaging! Many packages also have a pattern on the inside and/ or a web address with free patterns.

The next day I started on a hat! I have decided I want to make a squid / kraken (on the way to knowing enough so I can make the wire scales) so I'm making a couple projects that I want before I get to the scales! Along the way I want to explore how quickly one can start making very useful and creative things using crochet, and next I wanted to see if I could make a hat, off the top of my head  ; ) , so, on this first go I didn't use any guides. The hat turned out fairly well, and fit nicely, except for a localized bump where I started making the hat too large  ; )  I was distracted from my crochet practice for a few days and when I returned to my "finished" hat I decided to pull it apart and start over! This is one of the things I really like about crochet, if you don't like what you've done you can easily deconstruct it and start over!


This time I was quite happy with my finished hat!
Unfortunately I do not know enough to be able to tell you exactly how I made this (or to share how you can make one just like it), but this second build started with a chain stitch loop and 24 half double crochets into the middle of it and then the bulk of this one was rounds of half double crochet and double crochet.

I will also figure out, as I learned to read crochet patterns, how to write them so I can share what I make with others!


Now it's time to build another hat (this time using some instructions and new stitches) and start on the squid/kraken! I really want a squid that will fit on my hat (no, I'm not given to sticking things on my hats,


so there is NO real explanation for this sudden shift in behavior    ; )  , and with a different yarn texture than my hat, so I think I'll start with ............


~> ~> ~>


Join us in our ongoing Quest...
... continued ... 


Saturday, February 9, 2013

Coastal Fossils- The Winter Collection #1 (1 of 2)


 ...continued from... Coastal Fossils - Gifts of the Winter Beach #3


We collected so many interesting fossils and agates during our winter excursion to the central Oregon coast [IBLs] that it will take a couple posts to share all of them! We'll separate them into 2 main groupings: 1) Moolack Beach and 2) Lost Creek Beach. Moolack Beach will be shared first since that is the smaller collection (and I've managed to photograph all of it already!  ; )

Individual finds/fossils will be explored further as we have time.

Right! Now on with viewing the collections...

The Moolack Beach Collection / Fossils


To the right is the entire collection from Moolack Beach (except the "finds" that includes the specimens photographed and left "in situ" (in place)).

As I said earlier, the collection from Moolack Beach is smaller than the Lost Creek collection, but it is an intriguing collection...
... and we'll save the most intriguing find for last, since it will take the most space to get a good look at it.


~~~~~~~~~~~~~~~~~~
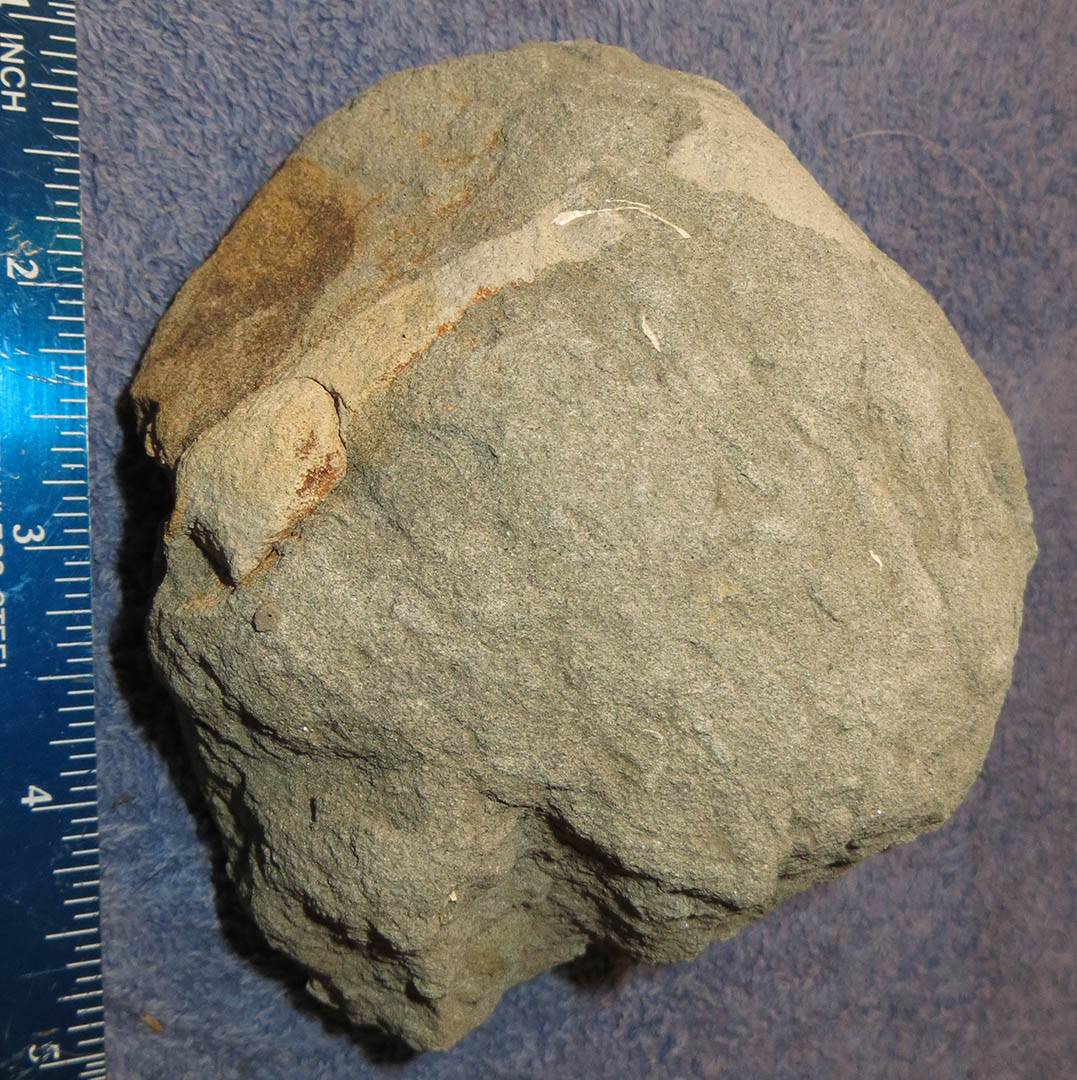
#13-1_M1


< This is the largest of the concretions that we collected (upper left in the "group photo" ; )  on this excursion. It measures ~ 9 1/2" long.


Even at this stage you can easily see several different types of bivalves (clams), a couple gastropods, and two fossils that are showing up as a very different sort of fossil- "brown" (see one up close below).


This is the "left edge" of the piece shown above. I'm not absolutely sure what we are looking at here, but we'll get a better idea once we have a chance to look at it closer and start carefully removing the surrounding rock.
By the way, if you can identify any of the fossils being shown we'd love to hear from you!


~~~~~~~~~~~~~~~~~~
#13-1_M2


This smaller concretion has a lot of intriguing things going on; this piece has a lot of exposed crystalline structure, some interesting bivalves,


...and we'll be looking at these unusual (exposed)  structures to see what they are also... >


 ~~~~~~~~~~~~~~~~~~
#13-1_M3
 This concretion appears to be all bivalves...


~~~~~~~~~~~~~~~~~~
#13-1_M4


This concretion is about 6 1/2" long. We will leave some of these concretions "intact" in order to share what to look for on the beach when hunting fossil concretions!


~~~~~~~~~~~~~~~~~~
#13-1_M5


This fossil looks like it is likely bone, but we'll see! The fossil is in moderately delicate sandstone, which will make it easier to extract.


 ~~~~~~~~~~~~~~~~~~
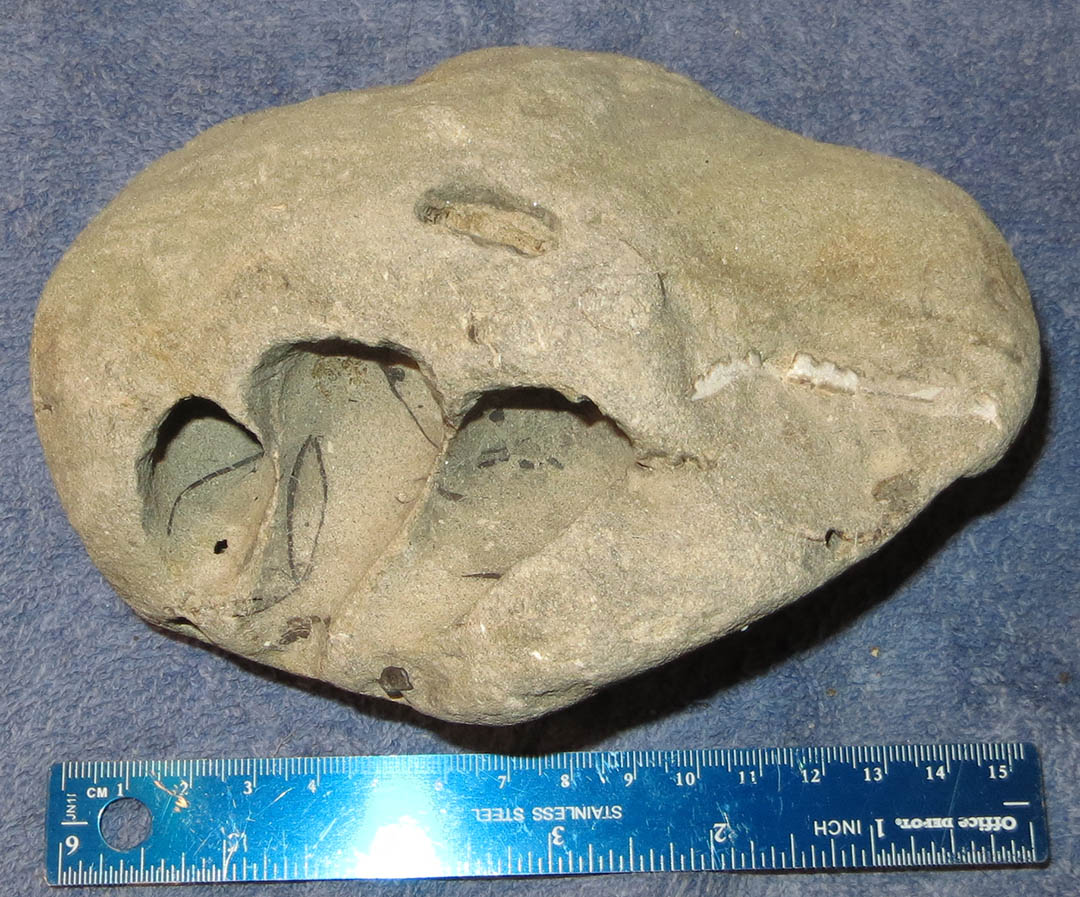
#13-1_M6


We also found some interesting mud stone type pieces. This one is particularly interesting since something has created/bored fairly large holes in the  mud stone (very hard mud stone in this case), including boring right through several fossils.

This one is very interesting "as is", so I doubt we will do much, if any, cleaning on it. 


.... sometimes you can get "help" ...


         ~~~~~~~~~~~~~~~~~~
         #13-1_M7/ 8/ 9/ 10/ 11

Several pieces with exposed shell.
~~~~~~~~~~~~~~~~~~
#13-1_M12


~~~~~~~~~~~~~~~~~~
#13-1_M13

Another concretion with assorted mollusc fossils.


~~~~~~~~~~~~~~~~~~
#13-1_M14/ 15/ 16

Small concretions with bivalve fossils.


Most of the following pieces have a fairly granular texture:

~~~~~~~~~~~~~~~~~~
#13-1_M17/ 18/ 19/ 20 


~~~~~~~~~~~~~~~~~~
#13-1_M21


~~~~~~~~~~~~~~~~~~
#13-1_M22/ 23/ 24


~~~~~~~~~~~~~~~~~~
#13-1_M25/ 26/ 24


The following pieces are agates or have some agate-like qualities:

~~~~~~~~~~~~~~~~~~
#13-1_M28/ 29/ 30/ 31/ 32/ 33


~~~~~~~~~~~~~~~~~~
#13-1_M34/ 35/ 36/ 37/ 38/ 39/ 40


~~~~~~~~~~~~~~~~~~
#13-1_M41


the most unique of our finds at Moolack Beach....
~~~~~~~~~~~~~~~~~~
#13-1_M42

This fossil ....


Join us in our ongoing Quest...
... continued in... Coastal Fossils- The Winter Collection #2 (2 of 2)[IBL]; the Lost Creek collection / fossils.